
Its that time of year again when the kids are graduating from school. I don't know about where you live, but where I live leis are very popular to wear for graduation. My oldest granddaughter is graduating from Kindergarten and I wanted to make her a special candy lei with money on it.

I decided I wanted butterflies made from dollar bills on it, but after searching the internet I couldn't really find a tutorial on how to make the butterflies I wanted that looked like the ones on the leis you can buy.
Hmmm.....must be some kinda secret.
So I decided to give it a try from what I found and came up with my version. This is for a 6 year old so you may need to adjust it accordingly for a larger person. Here is the way I made mine. Feel free to use what you have on hand - thats what I did.
First gather 20 nice crisp $1 bills. This will make 10 butterflies. If your making a larger lei you will probably need more $$$$ for more butterflies - or you could space them out farther.
~ To Make the Butterfly ~
The first bill is folded in on each edge folding thru the center of the 1 on the back of the bill.
The green side of the bill is going to be the front side of your butterfly.
NOTE: If you look closely you can see there is kind of a white line above the bottom 1. Fold on that line.
 |
| view of the fold line |
Next fold the bill in half. Open it up and fold each of the corners over to meet the center - kinda like your making an airplane - to form a point.
 |
| folding the first bill part 1 |
Then you are going to fan fold the bill along the long sides. Start by folding where the white part meets the green color on the bill.
 |
| folding the first bill part 2 |
For the second bill you will just be fan folding the short end.
Start by folding where the white border meets the green color. Fold towards the face side of the bill.
 |
| folding the second bill |
Now you have your two pieces of the butterfly. Fold each piece in half to form the upper and lower part of the butterfly.
 |
| attaching the bills |
I used floral wire to connect the two pieces. I seem to use wire for lots of things and this is what I had on hand. You could also use string or ribbon.

I took about a 10" piece of wire folded in half and wrapped it around the two pieces and twisted it a couple times in the back.

Then I put a bead on one of the wires and wrapped it around the front to the back and made one twist to keep it on.


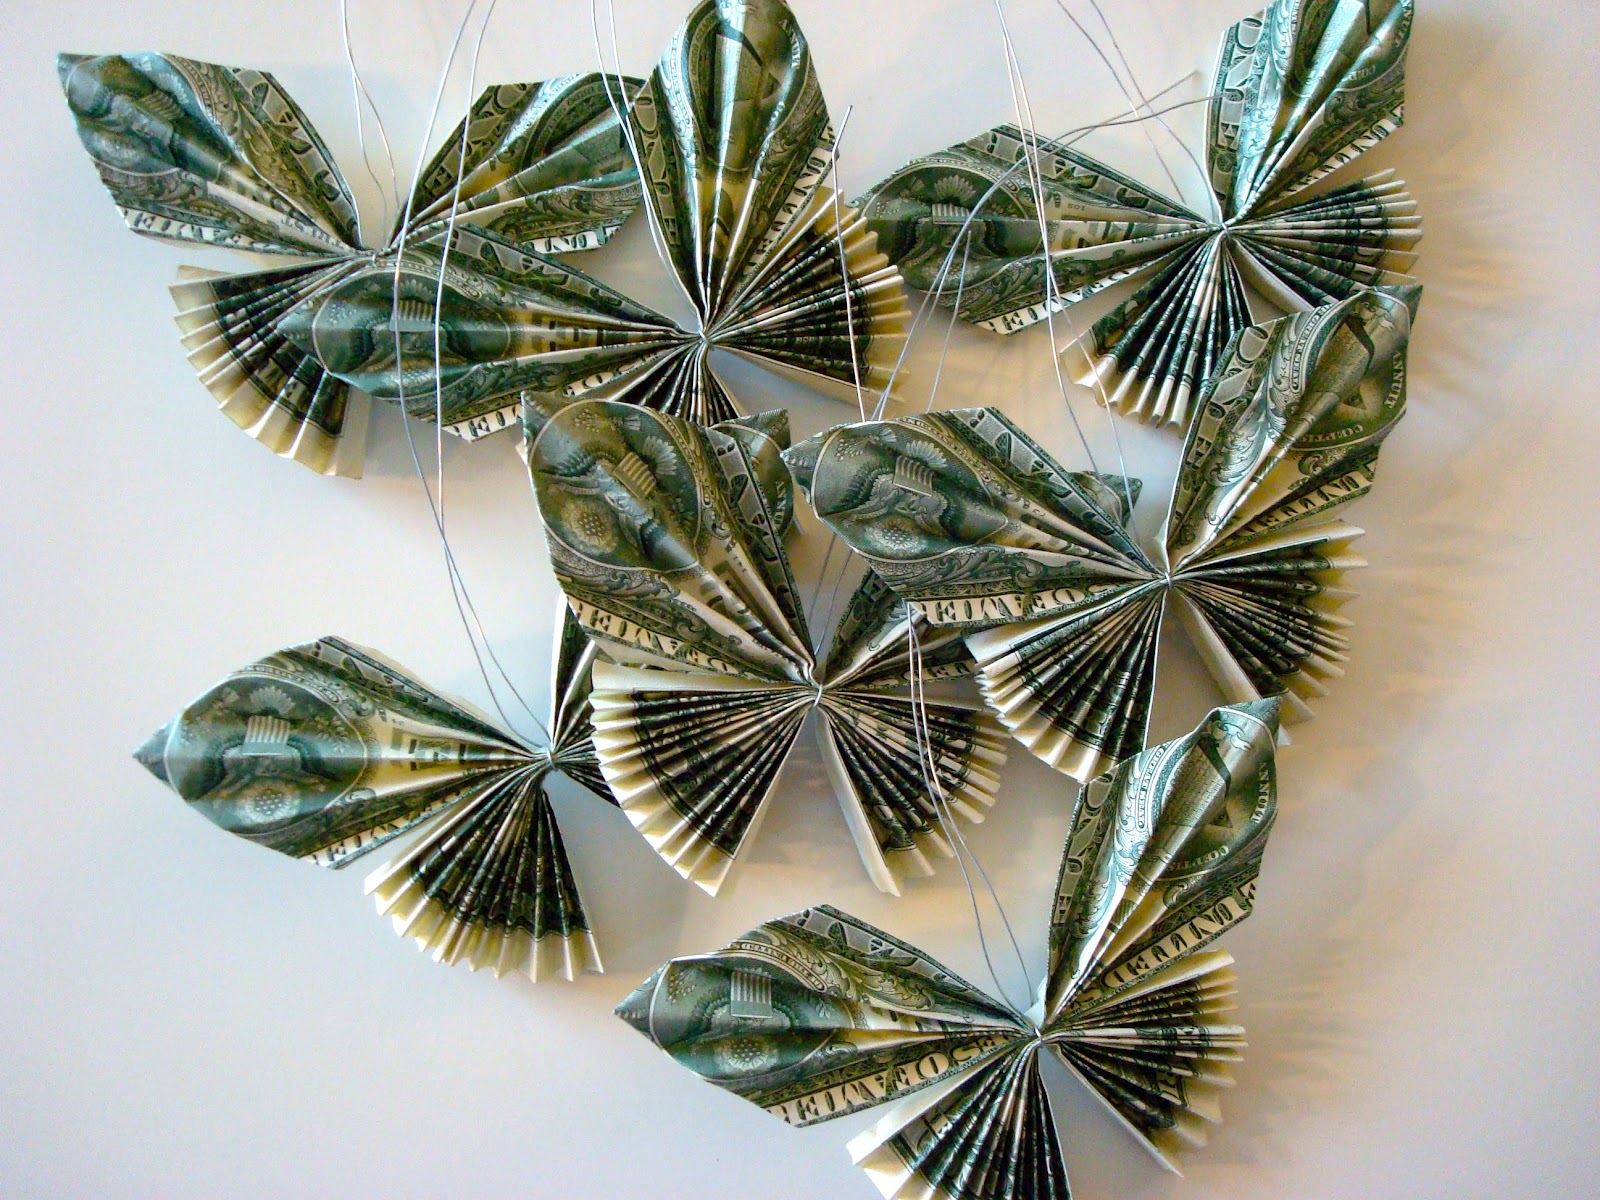
Now you have made a butterfly.....only 9 more to go!!
 |
| dollar bill butterflies |
~ To Make the Candy Lei ~
Next we need to make the lei part to add the butterflies to. I used pink cellophane wrap I had leftover from another project. It would be fun to use cellophane in school colors. You could also use regular plastic wrap.
Lay out your candy bars on the cellophane to see how long you need to make it. Be sure to allow enough space between your candy to tie the ribbon.

Remove the candy and cut the cellophane wrap in half. Mine measures about 10" when cut. Then lay out your candy leaving space to tie your ribbon in-between. I used 10 fun size Snickers bars that I bought at the dollar store for a small lei. You could use any candy you want. If you want a longer lei use more candy.

Fold your cellophane over about 1/3 of the way over the candy and begin rolling your candy into a tube.
I found it easier to begin in the middle and roll the tube over going down each side and straightening as I rolled it over.
Don't be too worried about the spacing between the candy. You can adjust that when you tie it off.

Now cut 10 pieces of ribbon about 8"-10" long. Starting in the center, tie the ribbon in a knot around the cellophane tube. Trim the ribbon as necessary.

Continue down each side of the tube adjusting the candy evenly and tying in between each candy bar until you have a long tube.

Leaving about 1"-2" at each end, twist one side of the cellophane tube end and insert it into the other open end far enough to be able to tie it off. Then tie it off like the rest.

You will now have a candy lei!!

Now to attach the money butterflies. Be sure the wire is to the back of the butterflies.
Insert the butterfly over the front of the tied off space and twist the wire several times in the back.
 |
| wire twist |
Clip the wire to about 1/3" and bend it over so its not poking out.
 |
| bent over wire |
Continue tying on your butterflies.
Congratulations.......
You have just made your first candy lei.
Turn it over and admire it!!

Whoever you give it to is going to LOVE it.

I did my best to make these instructions easy to follow.
I don't do too many tutorials
so let me know if you have any questions.
Robin
*Had to add a picture of her in the lei*


It looks so good. Your tutorial is very very clear and I can't wait to get started on one.Mine will be euro notes.
ReplyDeleteThanks Robin - you made this a snap! I'm really excited for the girl I am making it for!
ReplyDeleteLOVE IT! My butterfly turned out great!
ReplyDeletelove the butterflies! thanks for the tutorial.
ReplyDeleteSo cute! Just made a butterfly... I'm thinking these would make adorable gift toppers as well. =)
ReplyDeleteVery nice! Sharing this with our group members at CafeMom - Holiday and Party Crafts - with a link back to your tutorial. Thanks! ~ Yolanda ~
ReplyDeleteI love this and the instructions are crystal clear. Thanks for sharing. I can't wait to give this to my daughter at her graduation tomorrow.
ReplyDeleteThis comment has been removed by the author.
ReplyDeleteThis is a great idea, and love the idea of using money butterflies as gift toppers!
ReplyDeleteGorgeous gift idea!
ReplyDeleteThanks so much for putting this tutorial up! I made it for my daughter (22) and she loves it so much, she doesn't want to take it apart! So easy to follow and it turned out beautiful! Thanks again!
ReplyDeleteThanks so much for putting this tutorial up! I made it for my daughter (22) and she loves it so much, she doesn't want to take it apart! So easy to follow and it turned out beautiful! Thanks again!
ReplyDeleteWonderful tutorial! Thank you so much, I can't wait to make this for my daughter.
ReplyDeleteYou did an awesome job and the directions were very easy to follow! The pictures helped even more. Thank you
ReplyDeleteYou did an awesome job and the directions were very easy to follow! The pictures helped even more. Thank you
ReplyDeleteThank you so much for this very easy and straight forward tutorial! Can't wait to make my butterflies!
ReplyDeleteThis is just too cute for birthday gifts or anytime gift. Thanks
ReplyDeleteThanks for great instructions! Mine came out great for first try.
ReplyDeleteOne cute little Graduate. The Lei* I love it. Thank you for all these ideas. I will add a picture when I use it.
ReplyDeleteOne cute little Graduate. The Lei* I love it. Thank you for all these ideas. I will add a picture when I use it.
ReplyDeleteI can't wait to make this for my 6 year old granddaughter's preschool graduation. You did a magnificent job with your detailed pictures. Thank you so much for your help. I appreciate you!
ReplyDeleteI made this for my granddaughter for her 14th birthday, with 14 butterflies, made from $5 bills ($10 per year = $140); it came out really nice! She loves it and will hate to dismantle it to get to the $$ and candy (but she will, no doubt!!)
ReplyDeleteThis is very popular now adays. Thank you for the turtorials. I've seen sone with a !0 dollar billa. Very creative
ReplyDeleteThank you so much for putting this tutorial together! My lei looks amazing thanks to you~
ReplyDeleteThank you for the great idea and thoughtful instructions
ReplyDeletewow na wow..so cool butterlies in a lei...thank you for the tutorial... more power, Robin...
ReplyDelete